Followers

Sony Ericsson ST18i No Lights /No Display Solution Here 100% Tested

PROBLEM/MODEL:
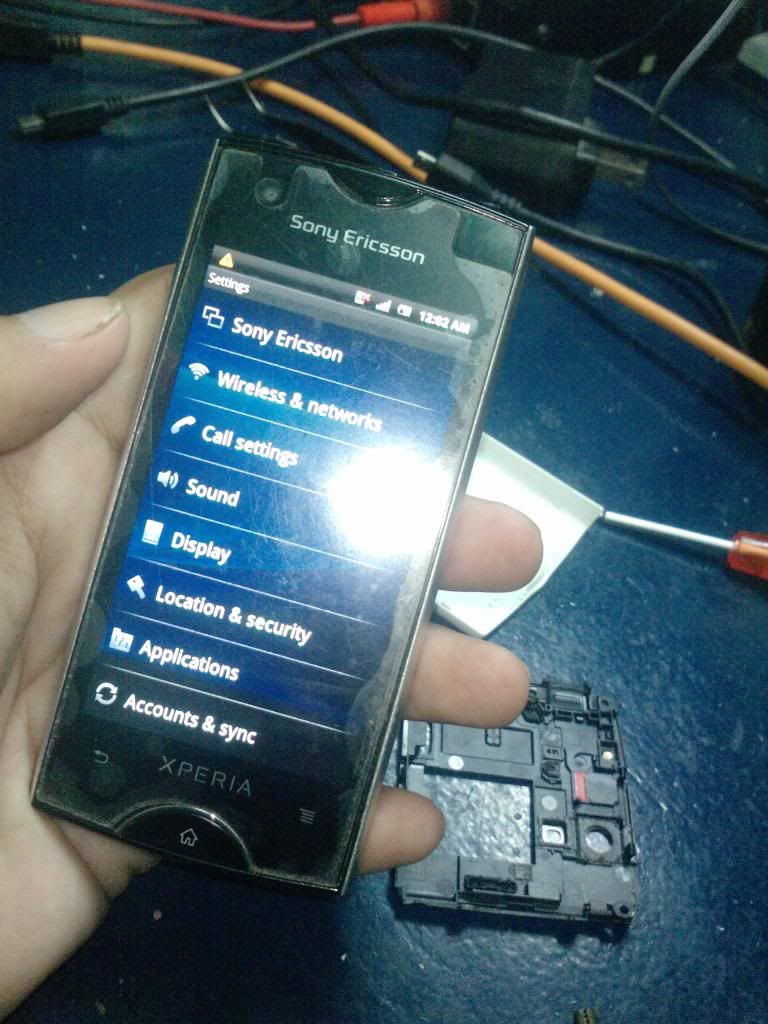
ST18i XPERIA RAY NO LIGHTS/NO DISPLAY
SOLUTION:
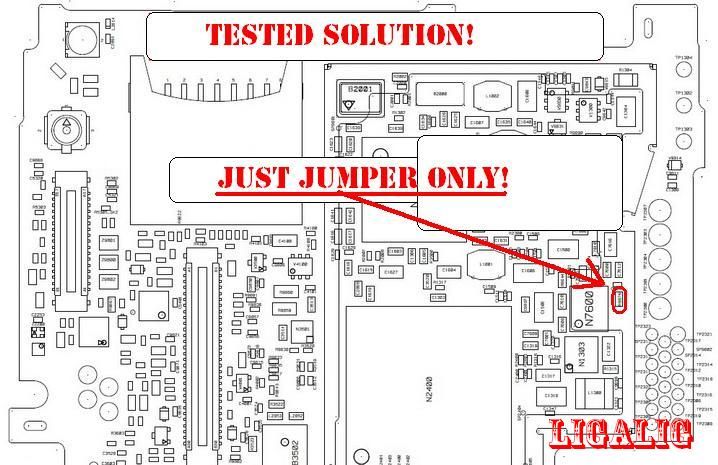
JUST FOLLOW THIS PICTURE :tgy

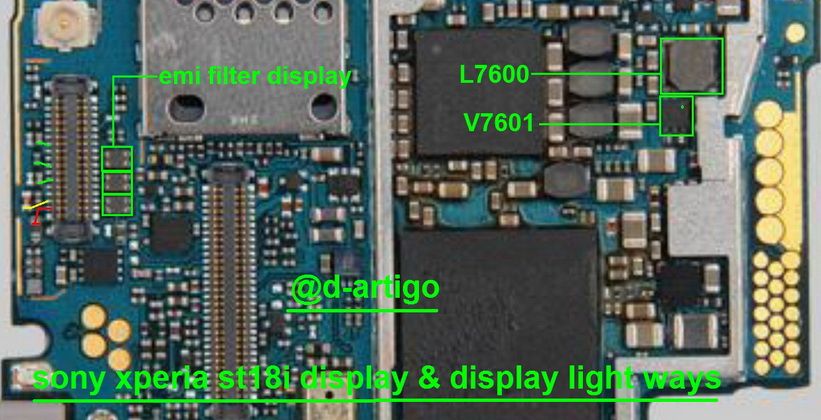
Sony Xperia ST18i display and display light ways
1. try the five-point jumper to his lcd pin (see picture below)
if the lcd is still as before rehot or replace third emi filter lcd

2. if its lcd light not work after the fifth point jumper pin
lcd ..... replace the L7600 and V7601
open its schematic diagram


How to Root Galaxy S3 (AT&T) SGH-I747 on Android 4.1.2 Jelly Bean Firmware


The AT&T version of Samsung Galaxy S3 (SGH-I747) has just received a new software update based on Android 4.1.2 Jelly Bean. The new software update is now available as an Over-The-Air (OTA) update.

Samsung Galaxy S3 (AT&T) SGH-I747 users who have already updated their devices with Android 4.1.2 Jelly Bean, may root their devices using the tutorial below.

This tutorial uses CF-Auto-Root file released by recognised XDA Developers, Chainfire. The CF-Auto-Root file allowing Galaxy S3 users to root their devices easily without depending on the firmware. It completely supports Android 4.1.2 Jelly Bean and future firmware as well. Head over to the CF-Auto-Root main thread to learn more about the root method.

Note: Using this root increases your flash counter. The flash counter keeps track of how many custom firmwares you have flashed, as this voids warranty. Triangle Away can be used to reset the flash counter after installing CF-Auto-Root.

Disclaimer: Rooting voids the warranty of your device. We and the developer of this rooting procedures shall not be held responsible if any undesirable outcomes may happen to your device. use of this root guide is solely at your own risk!

Pre-requisites
1. Install USB Drivers for Samsung Galaxy S3 on the computer.
2. Enable USB Debugging Mode on the phone by navigating to Settings >> Developer Options.
3. Make a backup of all your important data before following the guide.
4. Ensure the battery of the phone is charged more than 80 percent.
5. The CF-Auto-Root file works only on Samsung Galaxy S3 (AT&T) SGH-I747. Applying this to any incorrect variant might brick the device. Verify the model number of the Galaxy S3 by navigating to Settings >> About Phone.

File Required
1. CF-Auto-Root (Mirror Link) for Galaxy S3 (AT&T) SGH-I747 (CF-Auto-Root-d2att-d2uc-samsungsghi747.zip)
2. Odin 3.07

Steps to Root Galaxy S3 (AT&T) SGH-I747 Running on Android 4.1.2 Jelly Bean Firmware
Step 1: Extract CF-Auto-Root and Odin 3.07 files using winrar/7zip/winzip or any other extracting tool.
Step 2: Switch off the Galaxy S3. Then boot the device into Download Mode by pressing and holding Volume Down, Home and Power buttons together until a construction Android robot icon with a warning triangle appears on screen. Now press the Volume Up button to enter Download Mode.
Step 3: Launch Odin on the computer as an Administrator.
Step 4: Connect the Galaxy S3 to the computer using USB cable while it is in the Download Mode. Wait until Odin detects the device. When the device is connected successfully, the ID: COM box will turn blue with the COM port number. Additionally, the successful connected will be indicated by a message saying Added.

Note: If the Added message does not appear, then try re-install USB drivers or changing the port on the computer.
Step 5: In Odin, click the PDA button and select the CF-Auto-Root-d2att-d2uc-samsungsghi747.tar.md5 file.
Step 6: Verify that Auto Reboot and F.Reset Time checkboxes are selected in Odin. Also, ensure the Re-Partition option is not selected.
Step 7: Double-check and click Start button in Odin. The installation process will now begin.
Step 8: Once the installation process is completed, your phone will restart and soon you will see a PASS message with green background in the left-most box at the very top of the Odin. You can now unplug the USB cable to disconnect your device from computer.

Samsung Galaxy S3 (AT&T) SGH-I747 running on Android 4.1.2 Jelly Bean firmware is now rooted successfully. You can now install any app that requires root permission. Verify the root status of the device by downloading Root Checker app from Google Play Store.
Apple iOS 7 Beta 5 iPhone 5


Apple iOS 7 Beta 5 iPhone 5 | 2.37 GB
This is a pre-release version of iOS 5 beta 7 (build 11A4449a) for developers is compatible with iPhone 5
The device, updated to this version of iOS beta 7 can not be restored to earlier versions of iOS.

Update Galaxy Note to ICS Rocket ROM XXLRK Firmware Free Download

The Android 4.0.4 Ice Cream Sandwich is prevalent in the market and your Samsung Galaxy Note N7000 might have received this update officially but here comes the one ICS based custom ROM which is feature rich and it comes with most stable feedback.Galaxy Note AT & T
In this article we go through details on how you can apply this firmware to your Samsung Galaxy Note N7000 device based on the XXLRK Firmware.
Features  & Enhancements
The following features are added in this firmware -
  • Bsed on official XXLRK Firmware
  • Modem XXLRK
  • deodexed, zipaligned and rooted by me
  • Kernel Notecore 8.1 (thanks gavin)
  • added multiple CSC-Files
  • fixed CRT-Off Animation
  • 4 Way Power Menu included
  • Full SIP (VOIP) support
  • Ntive Call-Rec
  • LiveWallpapers Galaxy S3
  • Swype included
  • Google keyboard included
  • Auto BackUp EFS / sdcard / efs.autobackup.img
  • added Playstation Certification
  • added BEATS Audio (thx Awesome!)
  • JB wallpapers included
Pre Upgrade Instructions
Please make sure that you go through this pre upgrade instructions –For heardsolution.blogspot.com
  • Also you should ensure that your phone is charged up to 50 % of the overall battery life. This is to ensure that your phone doesn’t turn off during the process of the firmware update.
  • Please make sure that you have enabled the USB debugging on your smart phone. To do that you need to head to Settings > Applications > Development and then select USB debugging”.
  • Make sure that you have selected the USB debugging option as ON. To do that follow the path “Settings > Applications > Development > USB debugging”.
  • Take the back up of existing application on your mobile phone and you can make use of –
SMS – Use “SMS Backup & Restore app”,
Contacts – Sync with the Gmail application,
Call Log - Call Log and Restore
Procedure to Apply Update
Ensuring that you have followed the above pre requisites you need to follow the below mentioned instructions to apply the updates on your device –
  • Download the Rocket ROM Firmware Package on to your laptop or PC. It’s a large file and first download that, after wards proceed with the updates.
  • Once downloaded, using the USB cable you need to connect Galaxy Note to the PC and place the zip in your device memory.
  • Once the transfer is done, remove the device safely and power of your devices so as you can enter in the recovery mode.
  • Once can easily enter Galaxy Note in the recovery mode by pressing the key combination of Volume down key, OK button and holding them simultaneously you need to press the Power button.
  • You will then see the Recovery menu options. Among the several options you need to select “install zip from sd card” > “choose zip from sd card” and select the downloaded package file. It will then take 10 minutes to apply the updates to your device and once it’s done, hit “++++ Go Back ++++” and then finally select “reboot system now”.
In case if your device doesn’t boot up, then remove the battery and reinsert it to try again. Do let us know if you face any issues during the update process.
Via

What others Searched for:

root galaxy note 4 0 4 xxlrk,تلفون كلاكسي نوت,root galaxy note xxlrk,root galaxy note ics 4 0 4 xxlrk,xxlrk root,how to root galaxy note xxlrk,How to root galaxy note n7000 xxlrk,root xxlrk,XXLRK,update samsung galaxy tab 2 p3100 to official zsbhl3 based 4 0 4 firmware,

How to Flash Update/Upgrade Samsung Galaxy TAB P1000 Step By Step Procedure Here & Firmware Free Download

Here's the step by step procedure on how to Flash, Upgrade or Update the Samsung Galaxy TAB P1000 Firmware.
Disclaimer: Make sure to select the right firmware version that only match with your region. Firmware versions may varies from countries or regions and or service providers. Do Not Apply this method if you are not familiar with firmwares. This procedure are for advance users only and not recommended for beginners. Proceed with necessary precautions,... We are not liable if something happens to your phone.

Tools needed in this process:
Samsung Galaxy Tab P1000 Downloader Program:
Download link 1, Download link 2

Driver: Samsung P1000 Galaxy Tab USB Drivers
Download link 1, Download link 2

USB Data Cable

Firmwares: Samsung P1000 Galaxy Tab Firmwares
P1000XXJH8 - P1000_XXJK5-OXAJK5 - P1000_XXJM6-OXAJM6 - P1000_XXJMA - P1000_XXJMC - P1000XWJMF - P1000XWJMI - P1000JPJM4 - P1000JPJM5 - P1000XWJMK - P1000BUJMC - P1000XXJMG-OXA

Or find the Latest firmware here:

Firmware Flashing Steps and Procedures
1. Run Samsung Galaxy TAB P1000 Firmware Downloader program.

2. Check these: Re-Partition + Auto Reboot + F.Reset Time checkboxes.
Select PIT file in its field.


3. Prepare the Device Into Download Mode ( Press Volume Down + Power ON button at the same time).

4. Connect Data Cable To Phone.
The highlighted yellow ID:COM box is and indication that the device is connected properly to PC.

If you still do not get any results, try another USB port on your computer.


5. Start to Flash the PIT file by clicking Start Button. Then wait... Do not touch the phone until a "PASS" appears on the left side of the screen is an indication that when the process successfully completes.


6. Click on Reset button, then unselect Re-Partition box. Then select and load the PDA, PHONE and CSC Files each in each desired boxes.


9. Remove the battery, then enter Device into Download Mode again ( Press Volume Down + Power ON button at the same time)., then connect to the PC.

10. Start Downloading PDA, PHONE and CSC files by clicking Start Button. Then wait... The phone will be flashed and once it’s finished, it will boot up. Do NOT disconnect the usb-cable, remove the battery or otherwise interrupt this process! A "PASS" appears on the left side of the screen is an indication that when the process successfully completes.


11. When the flash download completes... Do Full Reset: *2767*3855#.

Update Samsung Galaxy Tab 2 P3100 to Official ZSBHL3 Based 4.0.4 Firmware Free Download

The Samsung Galaxy Tab 2 P3100 is the successor of the Galaxy Tab 7.0 available in various countries. This is with the advanced specifications and features included in the device. The Galaxy Tab 2 7.0 P3100 whether its Wi Fi or the 3G variant has got the Android 4.0.4 Ice Cream Sandwich operating system. Following in this article we will go through the procedure on how you can update your Galaxy Tab 2 with the officially released Android 4.0.4 firmware based on the ZSBHL3.
Samsung Galaxy Tab 2 P3100
Pre Upgrade Instructions
For the smooth run of this update on your tablet you should ensure the follow pre upgrade instructions to be fulfilled -
  • You also need to ensure that you have the latest Samsung drivers for your Samsung Galaxy Tab 2.
  • Also importantly, you should enable the USB debugging on your tablet as well. If its enable then its OK to proceed to next step but confirm it once by going through Settings > Applications > Developments > USB debugging. And here just ticked the “USB debugging” option.
  • Also ensure that you have disabled all the security antivirus and firewall protection on your device to avoid an interruption during the process of the update.
  • Also make sure that your Galaxy Tab 2 is charged atleast to 50 %. Although its very much fine if you proceed with the firmware update once when the battery is fully charged.
Procedure to Update
When you have fulfilled the above pre upgrade instructions, you should follow the below mentioned steps to apply the update.
  • Download the latest firmware package based on the Android 4.0.4 file size around 737 MB in total. You need to also download the Odin flashing tool with the latest version as the Odin3 v1.85.
  • Once the firmware package is downloaded, extract the same on your PC. Also open the Odin 3 v 1.85 tools on your CP which is a executable file used for updating your device.
  • Once the Odin is opened, you need to select “Auto Reboot”, “F Reset Time” boxes are ticked and “Repartition” box is unchecked.
  • Swith of your Galaxy Tab 2 tablet so that you can enter it in download mode.Odin tool
  • Once can easily enter Tab 2 in download mode pressing the key combination of Volume Down, Power button and follow the on screen instructions to enter into download mode.
  • Now connect your Tab 2 device to your PC using the USB cable. Make sure that ID:COM shows the Yellow color and message “Added” is shown.
  • Now select the following files under the PDA, Phone, CSC, PIT –
    PDA – Select the file with .tar in it.
    Phone – Select the file with *modem* in its name
    CSC – Select the *csc* in its name
    PIT – Select the .pit file
  • Now hit the Start button to begin the process of update.
  • Once the device is flashed it will be automatically rebooted and Pass message will appear in the Odin tool box. Now disconnect the USB cable from the tablet and see your tablet with the newly official 4.0.4 firmware.
You can check back for the new firmware version and the baseband version by going through Menu > Settings and About Tablet.

What others Searched for:

samsung 3100,samsung galaxy tab 2 gt-p3100,rom 4 0 4 p3100,p3100 rom,samsung tab 2,tab galaxy 2,tab 2,galaxy tab p3100,samsung galaxy tab 4 0,galaxy tab p3100 rom,

Samsung Galaxy Tab 10.1 Wi Fi P7510 Update Procedure to Official ICS 4.0 ROM Free Download

The official Android 4.0 Ice Cream Sandwich version has been arrived for the Samsung Galaxy Note 10.1 for those who has the former version of Honeycomb running on their device. In this article we go through the Galaxy Tab 10.1 Wi Fi P7510 firmware upgrade to the official Android 4.0 firmware release. This update hasn’t been rolled out officially worldwide, only selectively to various regions, but the interested users can grab this on their device as well.Galaxy Tab 10.1 Wi Fi P7510
This update comes with a lot of bug fixes and there is a major change in the user interface, however you might not see much difference in the UI as the Honeycomb is almost same as Android 4.0.
Pre Upgrade Requirements
  • Make sure that your device is Samsung Galaxy Tab 10.1 Wi Fi with model number a P7510 and not any other similar model. You can check the model number by going through “Settings > About Tablet”.
  • Users must ensure that they have taken the backup of data present on their tablet as it might get corrupted or get lost during the process of the firmware update. You can use KIES for backing up of the data or follow your known procedure.
  • The users should enable the KIES Mode on their device. These settings can be found on “Settings > Applications > Development > KIES Mode”.
  • Also ensure that the battery life left on the device should be atleast 40 % so as to ensure that device doesn’t get turned off in the middle.
  • Users should also disable any antivirus or firewall protection to provide uninterrupted service during the process.
Once you have done that you are ready to update your device. Follow the instructions mentioned below.
Procedure to Update Galaxy Tab 10.1 to ICS 4.0 Firmware
  • You need to download the ICS UELPL Firmware PackageOdin on to your PC. These are large size files
  • Once download you need to unzip the same on to your PC.
  • Now open the Odin tool and install on your PC.
  • Turn off the Galaxy Tab so that you can enter it in download mode.
  • One can easily enter Samsung Galaxy Tab 10.1 by pressing the key combination of volume down button, Power On button.
  • Once that is done, you need to connect your Galaxy Tab to the PC using the USB cable and while Odin tool is open on you PC, the ID: COM port shows Yellow color which means everything is going perfectly as of now.
  • Click on PDA and select “P7510XABLPL_P7510UELPL_HOME.tar.md5“ from the files downloaded above.
  • Once the selection is done, you can hit the Start button to proceed with the firmware update. It will take more than 4 to 5 minutes to the updates to be applied. Once the updates are successful the device will be rebooted automatically.
With that you have successfully update your device to the official Android 4.0 ICS update.

What others Searched for:

P7510 ics,p7510 ics official,ics p7510,p7510 jelly bean,samsung p7510 ics,p7510 ics update,icecream update p7510,update samsung galaxy tab 10 1,7510 ics rom,odin3 p7510,

Update Samsung Galaxy S III to Omega 12 Custom Firmware Free Download

The Samsung Galaxy S3 as expected will arrive with hundreds of custom ROM, Omega v12 finally comes here as it’s dubbed as XXBLG9. This firmware comes with a lot of advanced features included in the pack which we will go through this article. Over this article we will go through the update guide upon which you will be successfully able to update your device and apply the updates accordingly.Samsung Galaxy S III to Omega 12 Custom Firmware
To apply this firmware on to your Samsung Galaxy S III your device should be rooted. If you are unsure what’s rooting then please go through the Root Checker Android application to check for the rooting. Please make sure that you go through primary requirements like –
  • Make sure that the model number shown under the Settings > About Phone is GT I9300 and not any other model as sold in various countries.
  • Make sure that you have enough battery, considerably atleast 50 % should be left on your device.
  • Make sure that you take the backup of the existing files on your mobile phone. Do backup SMS, Contacts, Call Logs and other settings.
  • You should enable USB debugging on your device. You can go through the settings by following the path to “Settings > Applications > Development > USB debugging” making sure Debugging is selected.USB Debugging
Once you have followed these instructions apply the updates on your device.
Features of Omega v12
Check all the important features included this firmware are –
  • All stock applications
  • Flipboard updated to latest version
  • Google Maps App updated to latest version
  • Gmail App updated to latest version
  • Play Store v3.7.15 is the latest version
  • Introduces S memo
  • Modem XXLH1
  • Kernel Stock XXLG9
  • efs Backup (added the option to create efs backup during installation)
  • ClockWorkMod Recovery 5.5.0.4 v1.5 by Chainfire – (removed from v10)
  • CWM Manager v3.60 by Chainfire
  • CSC: BLF1 – set be default to EUR
  • Busybox v1.20.2
  • SuperSU v0.94
Procedure to Apply Omega v12 Custom ROM to Galaxy S III
  • First, download the Omega 12 Custom ROM Firmware Package on to your PC. This is a large file size and downloads it from any of the sources in through that link.
  • Once downloaded you need to connect your device using the USB cable to the PC and then transfer the downloaded content to the root of your SD card.
  • Once that is done, you need to disconnect your device and then turn off your device so that you can enter it in recovery mode.
  • One can easily enter in recovery mode by going through volume up button , Home key and the power button together pressed all at once.You can make use of the following video for recovery mode –
  • When you are in the recovery mode menu you need to go through the option of “Wipe data/factory reset” & “Wipe Cache partition”.Recovery mode
  • Hit “++++ Go Back ++++” to return back to recovery menu.
  • Now hit “Advanced” and then clear off the Dalvik cache on your device. If you are using official Samsung ROM then you can skip this step.
  • Now you need to select “install zip from sd card” > “choose zip from internal sd card” and then choose the Omega 12 custom ROM firmware package placed on your device.
  • Upon the selection of the file, it will take around 5 minutes, not more than that to apply these updates to your device. Your phone would be automatically restarted to the new firmware.
Once the updates are applied you can head to “Settings > About Phone” to check whether you have been updated to the Omega 12 custom ROM or not. Do let us know if you face any issues during the update procedure.
ViaWhat others Searched for:
samsung firmware-omega,GT-I9300XXLH1,root xxlh1,hard reset samsung s3 i897,galaxy s iii custom os,GALAXY APPLICATION,galaxy s3 omega rom,galaxy 3 custom firmware with extras,samsung omega,omega i9300 xxblg9 v12 download,