Followers

[GUIDE] How to extract FTF file step by step [GB/ICS/JB] [Newbie]

Sony Ericsson Xperia Mini, Mini Pro, Xperia Pro, Active, Ray, Live with Walkman > Xperia Mini, Mini Pro, Xperia Pro, Active, Ray, Live with Walkman General > [GUIDE] How to extract FTF file step by step [GB/ICS/JB] [Newbie] 
The reason behind to post this guide, if you had forgotten to make backup before flashing any mod. you don't need to write a post for getting the files of stock one.
you can get it from your ftf file and drag n drop into that flashable.zip which one you applied.
&
Rom porter can easily get the system dump.....

Before going to proceed this tutorial you need
  • your desired ftf file which you want to extract.
  • winrar
  • Flashtool
  • ext4_unpacker [ attached ]
Instructions:

First,open your ftf file via winrar and get the system.sin file.


Second,

  • open Flashtool
  • go to Tools -> Sin Editor
  • click on '...' button
  • open the system.sin
  • click 'Dump data' button
wait untill flastool shows 'Data Extraction finished'


Note: the below method depends on which one you get. 1st one is for yaffs2 & 2nd one is for ext4

Third,
  • open Flashtool
  • go to Tools -> Extractors -> yaffs2
  • open system.yaffs2
extraction will start


wait untill flashtool shows 'Extraction finished'
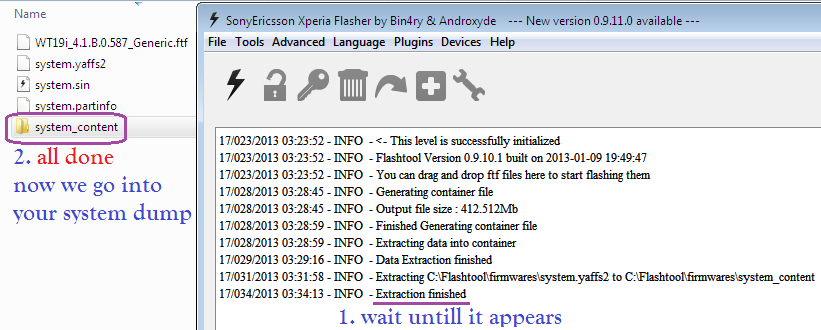


now you get the system dump.

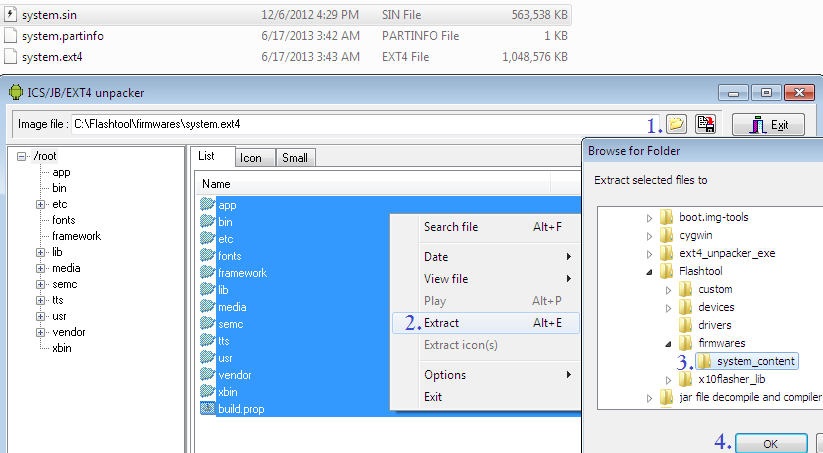
for system.ext4
  • open ext4_unpacker
  • click on the 'folder icon'
  • open system.ext4
  • select all
  • click right button of mouse
  • click Extract
  • select the destination folder where the files of system.ext4 will be extracted

ext4_unpacker_exe.zip - [Click for QR Code]  
Done

Nokia 110 All new Solution exe

Lumia 610 Mic Ways Print Missing Solution 100% Tested


GPGDraogn V3.38 Update Release--Small update-but useful

~~~GPGDragon Box~~~~
GPGDragon V3.38 Update News:


Update the Android Tap Clear Pattern Lock By Adb Support New MTK Android Mobile

MTK Unlock Pattern lock Or Gmail Clear without lost without debug!!!
Software Download Link:
4shared Download
MediaFire Download

MTK Unlock Pattern lock Or Gmail Clear without lost without debug

Software GPGDraogn V3.37

normal USB cable need(not boot cable)

mtk android one set with bettery

1.if mobile pattern lock before has debug,you can try in the android tap
and select clear pattern lock by adb,click start then clear it
but now we talk if debugs no have open before pattern lock how to do
look pic;mobile pattern lock and no have adb driver come,mean usb debug no open


in the MTK tab,select Write_IMEI,and tick the Android,untick the Scanpinout(power off your mobile)
Click Start now!!!!!!!!
Mobile go to ATE Mode


Dragon Get the IMEI and ABD Driver come now!!!clear Pics form computer


In Draogn Clear Pattern Lock done and Mobile auto reboot
input any pattern lock unlock your phone

This Test By MTK Mobile Set!!!It Not sure 100% working with all the MTK phone,but if you don't want to lost the user data after unlock phone,you can try this way!!!

Sony Ericsson XPERIA Neo MT15I Update To 4.0.4 Done

how to install the newest Android 4.0.4 for Sony Ericsson XPERIA Neo MT15i
a) first of all, check your firmware version (if you already have the newest one, you do not need this tutorial)
b) download and install latest Flashtool from here (mirror)
c) download also latest Android 4.0.4 (mirror) for Sony Ericsson XPERIA Neo MT15i
d) paste the ftf file downloaded in step c) to folder „Firmware“ included in the XPERIA Flashtool
e) open the XPERIA Flashtool, click on flash and choose downloaded firmware, than click ok. Important - if you do not want to delete any data of your phone, just uncheck flashing userdata.sin file. All data will remain in your phone, but sometimes it can cause additional troubles. So it is better (and I recommend that) to do the backup of your personal data, than proceed with clean instalation and then restore your personal data.
f) turn off your phone and when Flashtool shows pop up window, connect phone to PC with holding back button
g) after few minutes all is done and your phone gets the new firmware


Flashfile link here
Xperia download firmware - Download

Flash tool download from here..

Xperia download firmware - Download - Other

HOW TO FLASH STOCK FIRMWARE (.FTF/ROM) ON YOUR XPERIA...... here is Tutorial

http://xperiadownload.cz/index.php/tutorial

Allwinner A31 successfully flash tablet based This tutorial will explain the different steps to a on

PhoenixSuit custom Windows application. This tutorial will explain the different steps to successfully flash a tablet based on Allwinner A31


Step 1. Download and install PhoenixSuit

PhoenixSuit Windows program is usually included with your tablet’s firmware archive.
For convenience, we are including a copy for download here: PhoenixSuit download
PhoenixSuitPacket_v1.0.6.zip

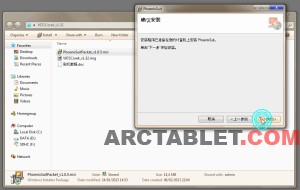
Older versions for archive: PhoenixSuitPacket_v1.0.6.zip Install PhoenixSuit by running the installer program PhoenixSuitPacket_v1.0.5.msi (the file name may vary depending on the program version) on your computer. The installer is in Chinese, but it’s quite straightforward pushing next button (situated on the right side) until the installation completes. Have a look on our video below to see the installation process in details.

Step 2. Download firmware image for your tablet and load it in PhoenixSuit

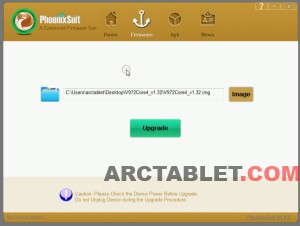
You need to download the firmware for your device. Manufacturers usually provide firmwares on their website. We also hold copies to latest firmwares on our forum. See at the end of this article for references. Once PhoenixSuit is installed, you can load your tablet firmware. Click on the Firmware button then Image button and locate the .img file on your hard drive corresponding to the firmware you wish to flash.

Step 3. Put the tablet in flash mode

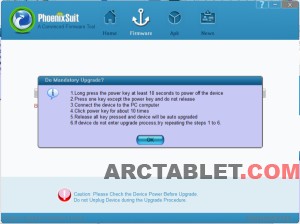
This step may appear a bit tricky as it requires playing with the hardware button on the tablet. Allwinner describes the procedure in the screen below:

Basically you need to do the following:

Disconnect the microUSB cable from your tablet

Shutdown the tablet, either from Android shutdown menu, or by pressing the Power button for about 10 seconds. The tablet screen should be black when the tablet is off.

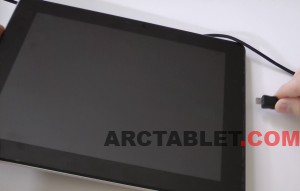
Press the Home button on the tablet, plug in the micro USB cable on the tablet, while keeping the home button pressed.


While keeping the Home button pressed, make short presses (about half a second duration each) on the Power button for about 10 times or until you see the dialog below on the Windows machine.

Once the tablet has entered in flash mode, you should see the dialog below.

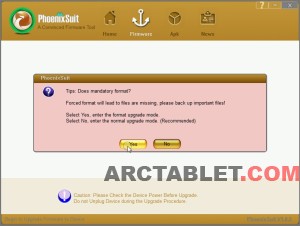
Please click Yes button to allow Format mode

Installing Rockchip drivers for Flashing

Installing drivers for Rockchip based Tablets!
Please follow the instruction below to install the Rockchip drivers onto your computer for purposes of flashing your tablet with custom firmware etc. This is the Arnova 10G2 Method, please refer to your own tablet recovery mode.

1) Hold the volume up

2) Press the reset button for two seconds than release while still holding the volume buttom, a few seconds later the tablet will go into recovery mode, the screen goes black.

3) Connect your tablet to your Pc with the supplied cable.

You will now see this pop up on your computer.

Now go into device manager on your computer and look for the UNKNOWN DEVICE, right click and select update device software and you will be presented with this screen.

Now click browse my computer for driver software. Locate the firmware folder and go to the drivers folder and select the correct driver for your operating system. This will now load the Rockchip driver for your tablet. See below
Click the always trust software from box, and this will install the Rockchip drivers on your computer and you will see this come up when finished.

You can now see the RK29 Device in device manager.
That is the driver installed and ready to go! Installing firmware using the Rockchip RKAndroid Tool
Go into the firmware folder and start the RK29 update program.

You should now see the FOUND RKANDROID LOADER ROCK USB at the bottom of the program screen, this is good your device is connected. Click Erase IDB and you will notice that some writing will come up on the right, just wait for that to complete. Now click run and this will install the firmware on your tablet.
Be patient for this bit it can take up to 5 minutes, you will notice that your tablet will have some writing come up on it, this is the flashing process. Once this is done your tablet will reboot with the new firmware

[ROOT] Micromax A62 How to root Micromax a62 easily

1. Before You Begin
1. This will void the warranty of your device !
2. Use at own your risk !
3. Backup your rom !
4. I am not responsible if anything bad happens !

2. Requirements to root
1. Charge your battery upto 70%
2. Micromax a62 driver
3. Enable USB debugging - go to in Settings>Application>Development>USB debugging
4. Supersu from play store
5. Root Master

3. Let's start
1. Install micromax a62 driver in pc !

2. Install Root master in pc !

3. Sure you ticked the USB debugging ! ?


4. Connect your device to pc !

5. Open Root master and follow or click on red rectangle


6. Follow and click on red rectangle-which i am showing in this picture ! your device is now connected to this software


7. Click on root and wait ! it's will automatically reboot your device


8. Your device is now rooted ! and now exit the root master


9. You can see this chiness superuser in your menu!


10. Install supersu or open if already installed ! and grant permisson like this


11. supersu will automatically install su binary (need internet connection)! just grant the permisson and let the supersu uninstall Chinese superuser


Your device is now rooted ,you can also apply this method on other chiness or spreadtrum devices ! it's safe
if you want to root your other devices then just pm me, i will tell you
thank you very much

[APP][ROOT] Android 4.1.2 Rooting Universal Method
This method is single for rooting your mobile!

[install]
1. Download Root Explorer [Google Play]
2. Download Root Master
3. Unpack and install Root Master on your PC
4. Install drivers of your mobile
5. Run RootMaster and press first button on first screen
6. After this click the center button on all windows
7. You mobile is rooted - Reboot your mobile
8. Close the RootMaster
9. Install Root Explorer and delete superuser.apk
10. This release of superuser.apk is not english
11. Delete or replace your superuser.apk in /system/app
12. Unpack Superuser.apk from zip and copy to /system/app folder
13. Reply yes to replace your apk Superuser.apk
14. If you delete superuser.apk reinstall Only superuser from Zip

Root Master Download
http://www.4shared.com/rar/hfs9oani/rootmaster.html

Superuser 3.1.3 Free
http://www.4shared.com/zip/KbSjKbGD/Superuser-313-arm-signed.html

Tablet AL-A13Q8 REV.5.0 Test Rom & Update Done

Tablet AL-A13Q8 REV.5.0 Test Rom & Update Done

PCB Text (Bord ID) - AL-A13Q8
phoenix suite english version :PhoenixSuitPacket_v1.0.6.zip
Tested Link : Q88 A13 SSD2532 DO-XHB GC0308 AL-A13Q8 RoHS .rar

Another Link : AL*-A13Q8*REV*5.0*2013.01.11*??????*SSD2532QN6.part1 - Download - 4shared

Other Link : Q88_A13_SSD2532_DO-XHB_GC0308_AL-A13Q8_RoHS_ - Download - 4shared

Note - 1st Link Tested By Me

Update Done


axtrom Tablets all Firmware Free Download

axtrom Tablets

7I01 7I02 7I03 7I04 7I05 7E01 7E01+ 7E02

Axpad 7" Series

Axpad 8" Series

Axpad 9" Series

Axpad 10" Series

here Quote:
axtrom?
1. Download the compressed Firmware file.
2. Extract or Unzip the file to a folder.
3. Open the folder and copy all the contents to an empty micro SD Card.

Your SD Card should contain the following:

4. Turn Off your tablet and insert the micro SD card into it.
5. Turn On your tablet and the upgrade process will start automatically.
6. Wait for the upgrade to finish and Remove your micro SD Card.
7. The tablet will Restart and boot with the new Firmware